The SIM Swapping Bible: What To Do When SIM-Swapping Happens To You
How to protect yourself from a SIM hijack, deal with an attack as it happens, and recover afterwards.
MyCrypto and CipherBlade have collaborated on this article to help you understand the dangers of a SIM-jacking attack, and how best to defend yourself against and attack, and how to recover from such an event. This article aims to be a “one-stop” article to read, reference, and share with your friends and colleagues. It's not short, but it's thorough.
We encourage you to ask questions and leave comments as you read. Whether you are a newcomer to this space or a long-time security expert, your commentary helps make this guide more comprehensive and keep it up-to-date. If you have more in-depth feedback, start a conversation with us.
Note: SIM jacking is also commonly referred to as "SIM-swapping," "SIM porting," "port out fraud," "phone porting," and "SIM hijacking." We use these phrases interchangeably in this article.
Of course, SIM-swapping isn’t the only risk that exists in this digital world. It’s a good idea to audit your online security overall, and we recommend referencing MyCrypto’s Security Guide For Dummies And Smart People Too.
Table of Contents
INTRO: What is SIM jacking?
- How do they get your SIM / phone number?
- How do you know if you’ve been SIM swapped?
- What happens once they get your SIM?
PART 1: What to do before you get SIM jacked
- Reduce the chances of an attacker successfully swapping your SIM
- Separating Concerns
- Securing your Google Accounts
- Securing your Apple / iCloud Accounts
- Securing your Password Manager
- Securing your Authy
- Securing your Telegram
- Securing ALL The Things
- Last Step: Prepare Yourself
- Bonus Round!
PART 2: What to do if you literally just had your SIM jacked
- Panic Correctly
- Call Your Phone Provider
- Lock Down Your Accounts
- Access or Return to Any Accounts You Haven’t Pull Logs From
- Call your phone provider again
- File a report with law enforcement
PART 3: What to do after you’ve been SIM jacked
- Inform your network
- Fully audit & secure literally all of your accounts
- Do not engage with the attacker
- Decide What Information to Share with People
- Decide What Information to Share with the Service Providers of Breached Accounts
- Protect Your KYC & Identity Documents
- Accept Some Harsh Realities & Work to Move Forward
- Consider Hiring Professional Help
CONCLUSION
INTRO: What is SIM-jacking?
Sim-jacking is an attack in which your phone number is migrated away from your SIM card / phone to a different SIM card / phone that an attacker controls. The attacker then uses this access to your phone number, usually via text message, to gain access to your other internet accounts. They do this by “recovering” access to an account (e.g., Google) or in conjunction with other information or access they have (e.g., using a previously leaked password + SMS 2FA).
“But I'm not famous / wealthy enough to have this happen to me!”
If you are reading this article, we guarantee that you are a potential victim of this attack. It doesn't matter how "famous" you are or how well-known or little-known you are. While there are certain actions that may make you a bigger target, we have seen far more people with increasingly smaller profiles falling victim to these attacks lately.
Why? The ROI for attackers getting their hands on your crypto is huge. Crypto is very unique — it's decentralized, it can be easily anonymized, and it has real monetary value. This attack is relatively easy, requires no code, and is becoming increasingly reported upon, inspiring more and more attackers to give it a shot.

In addition, your cryptocurrency isn’t the only thing that can be stolen. 2019 saw a transition from stealing crypto to stealing sensitive data, such as business documents, personal information, or other data. The SIM swappers no longer need to rely on directly stealing funds—they can also succeed via extortion.
Lastly, all the information an attacker needs in order to socially engineer a mobile phone provider's support representative is readily available via social media or sites like TruthFinder. Because most people (including possibly you) don’t realize the consequences of gaining unauthorized access to one’s phone number, it’s an area that is not secured in the same way other things can be secured.
All of the above results in more people attempting more attacks with more success. In turn, it's not just famous people, the "top 100 influencers," or high-profile traders who are under attack. It's anyone and everyone who is involved in crypto.
You are at risk. Accept this. Take action now before it is too late.
How do they get your SIM / phone number?
One of the reasons SIM-swap attacks have been so successful is that many mobile phone carrier representatives are extremely easy to socially engineer. An attacker can call up your phone provider’s support line, pretend to be you or another authorized party, and spin some story to get the support agent to transfer your number to the attacker's SIM. If they run into any friction, the attacker hangs up and immediately tries again with the next support agent.
While this shouldn’t be possible, especially if you have a PIN number or other protection enabled, it still is. Unfortunately, there is no fool-proof way to prevent your phone number from being ported.
Support agents aren’t trained on this type of attack and are able to migrate your phone number, regardless of the information “you” provide or don’t provide. 99% of their calls are from people who legitimately broke their phone or got a new phone and need this action taken. Support agents are typically paid next to nothing and their performance is judged by computers. There is little incentive for them to protect you from an attack they know nothing about, and a high incentive for them to help "you," keep "you" happy, and keep their average call times down. To make matters worse, any notes on your account are not prominently displayed to support agents and are completely inaccessible to them if you have an additional PIN / password on your account.

How do you know if you’ve been SIM-swapped?
- You may receive a call or text from your phone carrier’s support agent if the attacker disconnects in order to try again. Typically they’ll say something like, “Sorry we got disconnected...” Don’t ignore this! They were just talking to someone who was pretending to be you.
- You will suddenly and unexpectedly have NO cell reception. None whatsoever. Restarting your phone doesn’t resolve.
- You may have notifications that came through before your phone lost service or if you still are connected via Wi-Fi, like emails from your phone carrier or password reset emails from various services.
- You may have a system notification stating that you can no longer access a phone-level account (like your Apple ID or Google account) and need to re-enter your password.
- On Android, you may have a “this account was added to a new device” notification.
- On iOS or your Mac computer, you may have a "are you attempting to log in from Los Angeles, California?" pop-up.
- If you use any non-SMS 2FA mechanisms that have push notifications (e.g., Microsoft Authenticator, Apple), you may have a “here’s the code you requested” or “are you trying to log in?" notification.
What happens once they get your SIM?
They start “recovering” access to your accounts one-by-one, gathering data, personal information, passwords, and a list of products and services you use as they go. Let’s look at one SIMple example. Keep in mind, this is not a comprehensive look at what an attacker could do to you.
- An attacker successfully gets your phone number on their device, allowing them to receive all your incoming text messages and phone calls.
- The attacker attempts to log in to your primary Google account and clicks “Forgot password?”
- The attacker clicks “Try another way” until they get to the “Get a verification code sent to (XXX) XXX-XXXX” screen.
- The attacker receives the SMS sent to your phone number that they now control and successfully resets your password and gains access to your Google account.
- The attacker changes your phone number and recovery email to ones that only they control, ensuring you cannot easily regain access to your account.
- The attacker looks through your email and sees emails from Coinbase and Kraken.
- The attacker goes to these exchanges, clicks “Forgot Password?,” and enters your email address (that they now control).
- The attacker withdraws all your crypto from your exchange account to their own crypto addresses (approving all trades and withdraws because they have access to your email and text messages).
- The attacker buys more crypto with any USD holdings you have, linked credit/debit cards, or linked bank accounts. If these transactions are processed before you regain access to your Google or exchange accounts, your bank account will be emptied, sold for crypto, and in the attacker’s sole control.
Note: because the attacker has access to your email and SMS, they are able to intercept and then delete any emails or texts regarding your new password or withdrawals. This means you may not realize which accounts have been accessed or emptied until much, much later.
Needless to say, it is incredibly damaging, especially if a bad actor is able to take over a critical account—think Google, Apple, or your password manager—that allows them to gain access to other accounts.
PART 1: What to do before you get SIM-jacked
There is no guaranteed way to prevent your SIM from being swapped. Therefore, we must approach this from two angles.

- Reduce the chances of an attacker successfully swapping your SIM.
- Reduce the consequences if your SIM is indeed swapped.
The actionable items described below should take you three or four hours to complete. Please, take the time to secure yourself and your cryptocurrency. If you don't, perhaps consider that these decentralized, irreversible assets may not be a good fit for you right now.
We applaud you for making it this far. You’ve invested more time into educating yourself about personal security than most. This is essential in a space where there is no centralized party, government, or bank to fix things if they go wrong.
Reduce the chance of an attacker successfully swapping your SIM
Depending on your phone carrier, you will typically have the following options for authorizing the transfer of a phone number to a new device:
- A numerical passcode, like 1234. Except, please don’t use 1234, nor the last four of your social, nor your birth date.
- A passphrase, like “password1234.” Except, please don’t use “password1234,” nor your pet’s name, nor a password you use elsewhere.
- Requiring in-person presence at a store with government issued ID.
Obviously, #3 is the best option. We've worked with dozens of people who have been SIM-swapped and we have yet to see an attacker successfully swap a SIM in-store, with ID (although we do know of one case where it was attempted). This makes sense as it requires a lot of risk and effort on the part of the criminal.
The downside is that mobile carriers have not established a sterling reputation for adhering to any of these security measures and, even if they do “put a note on your account,” it does not mean that the support agent who handles a call regarding your account will heed the request.
Nonetheless, these steps are still worth taking, as it reduces the likelihood of a successful attack, makes it harder and more time-consuming for the attacker, and gives you the ability to prove you took these steps, which can allow you to pursue a civil case against your phone carrier, such as the one Michael Terpin has filed against AT&T.
Action Items
- Log into your mobile phone carrier account and change your password to a strong, unique password.
- Enable 2FA or an additional PIN or passphrase if you can.
- In any unused fields, like middle name or address #2, add your own notes. Like: “DO NOT SWAP SIM” or “REQUIRE IN-STORE VISIT FOR ACCT CHANGES!!” or “DON’T YOU DARE PUT MY # ON A NEW PHONE!”
- If you have multiple people on the account, see if you can remove yourself as a person with authorized access to make account changes. Imagine you are an irresponsible 12-year-old teenager and the other person on the account is your mom 😉. Do that. You may need to call or be in-person.
- Visit your phone carrier’s nearest location in-person.
- Document everything: date & time of visit, location visited, names and employee IDs of those you talked to. Ask for them to send you a text, give you a print-out, or send you an email confirming what you discussed and any changes that were made to secure your account.
- Instruct the representative that any request regarding your SIM, device, phone number, or account administration only be done in-store, after you present your government-issued ID.
- Request that a PIN or passphrase or both is added to your account when any actions regarding your account are requested.
- Share what you learn and what your experience was like with us and others, especially if there was something specific you said or did that worked especially well.
Helpful Hints for Success
- Be nice and courteous. It's unlikely that the minimum wage store employee knows about these attacks and certainly doesn't have the authority to implement and enforce proper security procedures on a corporate level.
- Inform them that you are a high-risk individual (even if you don’t think you are!) and you need to understand what they are doing to protect you from this style of attack. See what they offer before listing your demands.
- Have some links prepared on your phone to educate the person you are talking to about the style of attack and magnitude of loss. (One. Two. Three. Four.)
- If you aren’t getting helpful service, politely ask if they have a manager or colleague who is more experienced with high-risk individuals. Or, try again at a different time / location.
- Rumor has it that some phone carriers have special services for “high-risk individuals or celebrities.” Ask about that.
- Rumor has it that AT&T provides a super-secure option that locks down everything. The downside is you no longer have online access and even have to go into the store to pay your bill, like the dark ages. The upside is it’s much harder to be attacked. Ask about this, even if you aren't on AT&T.
Total Time Required
- Two hours on the absolute high end.
Reduce the consequences if your SIM is swapped
Separating Concerns
As a general rule of thumb, you should “separate concerns” when it comes to your phone numbers. While you probably only have one number at the moment, it’s time to upgrade your life.
Don’t use your primary cell phone number for business — the one everyone knows and is easily discoverable via your social profiles, open-source intelligence (OSINT) tools, or free online services. Don’t use your personal or business number for securing or logging into accounts.
A Google Voice number is free to sign up for. You can use a Google Voice number for SMS verification for websites and services that insist on using SMS 2FA or otherwise require a phone number. As long as the Google account you have associated with this Google Voice number is secure, you will be more secure.
Ideally, you will have a dedicated Google Voice number that you use solely for securing accounts. It should not be known by anyone nor should it be tied to a Google account you currently use / is known. Don’t share this number or email with people, and don’t enter it into a form when you make a random online purchase.
Action Items
- Create a new Google account.
- Choose a username that is not associated with you. Pick some random name. Have some fun—this is your new alter ego.
- Create a new Google Voice number with this account.
- Secure this account. Detailed instructions are found under “Securing your Google” section.
- As you are updating your existing accounts or creating new accounts, use this number whenever you are forced to provide a phone number for recovery or security reasons.
Total Time Required
- Less than 5 minutes
Securing your Google Accounts
Once an attacker gains access to your phone number they typically go directly to your Google account. It is here that the real damage begins.


Once an attacker is in your email account, they can initiate a password reset for any account that uses that email address to log in to or as a recovery method. This grants them an endless array of financial accounts and data, personal information, files, photos, messaging platforms, and who knows what else. Think about everything that is linked to your primary email. 😱
While the above cannot be understated, it’s also worth noting that emails are not necessarily the highest-value asset in your Google account:
- They can see all your saved passwords via chrome://settings/passwords.
- They can see all your bookmarks (like which exchanges you use) via chrome://bookmarks/.
- They can see your payment methods via chrome://settings/payments.
- They can see all your home, work, and old addresses via chrome://settings/addresses.
- They can grab your mnemonic phrase, along with some sexy photos, via Google Photos.
- They can steal your paper wallet backup stored in Google Drive.
- They can make a clone of your phone using your backups that are stored in Google Drive.
- They can see where you are currently, physically located and everywhere you’ve been in the past via your Timeline.
- Your calendar tells them where you will be and if you are traveling soon so they can time future attacks while you’re on a plane.
- If it’s not in your calendar, they can just Google “my upcoming flights.”
- They can access all your Google Hangouts messages, as well as your Google Voice messages and voicemails, as well as intercept incoming ones.
- They can access all your past Google Fi messages and voicemails and intercept incoming ones.
- They can see all your notes in Google Keep, like the passwords you save there.
- They can grab all your contacts, including your social security number and your secret key that you store under “Me.” They now have the names and phone numbers of your crypto-colleagues.
- They can view all the emails you sent to yourself with sensitive information in them.
- And all the rest of your emails.
- And now know every service they should visit and initiate a password reset for.
- And see all the apps you have installed and uninstalled, like which exchanges or wallets you prefer on your Android device.
- Not to mention all the sites you frequent and stuff you do.
- They can log into and “sync” their Chrome browser to your Google account, giving them access to all Chrome extensions you have installed.
- Access to and ability to edit, migrate, transfer, or redirect your domains.
- Access to and ability to edit, migrate, transfer, or redirect your websites and steal any data stored there.
- Access to and ability to edit and deploy any chrome extensions you manage.
- Access to and ability to edit any Android apps you manage.
- Access to all your data and your user’s data that is in Firebase.
- Access to any sites you use the "Log in with Google" button to log in to.

Needless to say, it is insanely important that you thoroughly secure every single one of your Google accounts. Not just your personal one. Not just your crypto one. Not just your business one. All. Of. Them. Please. 🙏
Action Items
- Go to your Google Account dashboard and then click “Security.”
- Under “Signing in to Google,” click “2-Step Verification.”
- Depending on what you have set up, what come next will vary.
- If you are prompted to “Use your phone as your second sign-in step” (aka “Google Prompt”), do that. Approve it on your phone. Then continue to #7.
- If you are prompted to use your phone number, do that, and continue to #7. (We’ll remove the phone number later.)
- If you go directly to a page called “2-Step Verification” with a list of options, skip to #11.
- Once you add one type of 2FA, Google will ask you to add a “backup option.” You want to use “Backup Codes" as your backup option, which are simply a set of single-use codes that you can use if you break your phone or otherwise lose access to your primary 2FA method of account. These are super important secrets and should be backed up and secured as such.
- Super important secrets are things like private keys, paper wallets, your birth certificate, or social security card and should be stored in a manner that optimizes for security and long-term, infrequent access. Do not print or download them. Don’t take a screenshot. Don’t take a photo. Instead, take out a pen and paper and write down the secret as carefully and legibly as possible. Then, take a new piece of paper and write it down again. Note the account they are for and the date. Keep these in two physically distinct, secure locations. You could store these in a fireproof / waterproof safe, something like a Steely or CryptoSteel, get a fire-resistance bag for <$20, or simply laminate them or put them in a Ziploc bag sealed with tamper evident stickers. One reason to have two copies is that if your house burns down, you have another copy. Get in the habit of backing up and storing critical account information, high-risk passwords, recovery codes, 2FA seeds, private keys, and seed phrases in this manner.
- Once this is done, click next.
- Finalize your 2FA set up by clicking “Turn On.”
- You should now be on a page called “2-Step Verification” with a list of all the available 2FA options. Regardless of what you have previously set up or just set up, let’s quickly audit all of it.
- Security Key: YES! This is the most secure option, but requires you to purchase a separate device like a Titan, YubiKey, Ledger, or Trezor. If you choose this option, I recommend also using the Authenticator app or Google Prompt just in case you leave your device at home. If you have good luck using only the security key for a couple months, you can remove Authenticator / Prompt at any point.
- Authenticator App: YES. We strongly recommend Google Authenticator, which you can download on any mobile device. (For reasons why we recommend Google Authenticator over Authy, see the section on Authy below). Click “Set Up” and then scan the QR code with your Google Authenticator app. If you want a backup of this code in case you break your phone, click “Can’t Scan It?” Follow the procedure outlined in step #8 and write down the string of numbers / letters displayed. If your phone breaks, you can re-add this to your new phone’s Google Authenticator app via this code. Confirm the 6-digit number displayed in your app. Click “Verify.”
- Backup Codes: YES. Always have backup codes and never store them on a digital device. See step #8 above for how to securely store your backup codes. If you didn’t just generate these codes, click “Show Codes,” then click “Get New Codes,” then back them up in the manner described in step #8.
- Google Prompt: YES or NO (your choice). The jury is out on how secure this is because it’s so new, but it seems fine as it’s tied to a device rather than a phone number. This may or may not be available depending on your mobile device. You can use it if you like it, or turn it off if you don’t like it.
- Voice or text message: NO! If this is already set up, remove it.
- Devices you trust: Click “Revoke All.” Let’s start fresh.
- Next, return to https://myaccount.google.com/security. Let’s audit these settings.
- Signing in to Google - Password: Make sure you are using a strong, unique password. If you haven’t changed this in a while, change it now. If you use this password elsewhere, change it now.
- Signing in to Google - App Passwords: Remove any if you have them set up. These were sometimes needed back in the day but now it’s just an attack vector waiting to be exploited as these bypass 2FA. You can always set up a new app password if you need to in the future.
- Ways we can verify it’s you - Recovery Phone: Remove your recovery phone! You can use methods from your 2-Step Verification to recover access if you need to. Click the “Recovery Phone” row and then the little delete / trash icon next to your number.
- Ways we can verify it’s you - Recovery Email: Remove your recovery email! Click the “Recovery Email” row. There is no "delete" icon, so click the edit button. Delete all the text in that line. Click “Done.” It will let you save the empty field, removing your email as a recovery option.
- Ways we can verify it's you - Security Question: This only appears if you have a very old Google account and previously set it up. If you see it, remove it immediately. Security questions are the worst of the worst when it comes to security.
- Rationale for removing recovery phone & email: 1) It is vulnerable to SIM-swapping! This is the first place attackers hit when they gain access to your number! 2) This Google account can be compromised if your old Google account is compromised. 3) Your business account can be compromised if your personal account is compromised. 4) It completely removes the “2nd-Factor” from the mix. 5) It leads to chains of attacks where access to a super-old Gmail account that you never secured can grant access to your “super-secure” Gmail account that you use for all your exchanges. 6) We see this attack vector utilized all the time and the damage is immense. Kill it with fire.
- Google apps with account access: Remove / revoke anything that you aren’t 100% actively using. You can always add it back super easily if you need to!
- Signing in with Google: Remove / revoke anything that you aren’t 100% actively using. You can always add it back super easily if you need to!
- Chrome / Google Password Manager: If you don't have a dedicated password manager like LastPass or 1Password, set one up now. (See the section on password managers below.) Migrate all your passwords that are saved in Google / Chrome currently, and then remove all stored passwords from Google / Chrome. This prevents an attacker who gets access to your Google account from getting instant access to all of your other accounts. Uncheck “Offer to Save Passwords” to ensure you don’t accidentally save something later. Use your LastPass or 1Password moving forward.
2021 Edit: LastPass is no longer going to be free for multi-device use, which means that you can use it on one device for free and you’ll have to pay to have any more devices synced. If you’d like to explore a free alternative, we recommend taking a look at Bitwarden — they have similar features and a guide on how to import your data from LastPass. - If you want to go even further, check out Google’s Advanced Protection Program. It’s pretty hefty but may be something that makes you even more secure.
Total Time
- 15 minutes per Google account + 10 minutes if you need to set up a LastPass or 1Password.
Securing your Apple / iCloud Accounts
Gaining access to your Apple / iCloud can give an attacker access to your history, bookmarks, passwords stored in iCloud Keychain, iMessages, photos (which may contain screenshots or photos of backups, private keys, etc.), files (which may contain backups of passwords or private keys), iCloud backups of your phones, computers, files, photos, and more.
If you use an iCloud email address, an attacker can access any account linked to that email address. They can also access, edit, and deploy any iOS or Mac applications you manage with that Apple account.
If you are uncertain if your account is secure or need assistance, we recommend hiring a Certified Apple Specialist that can walk you through the process and help you audit your Apple security. While writing this, we consulted with Alex from iHelp to clarify some things.
Apple’s Unique Recovery Process
Let’s look at the recovery process of an AppleID after completing the action items below. Unfortunately, your phone number cannot be removed and can be used as part of the recovery process of your AppleID.


There are two ways to proceed with the recovery process: via your phone number or using a stolen “trusted device” of yours that isn’t protected with a secure, unique password.
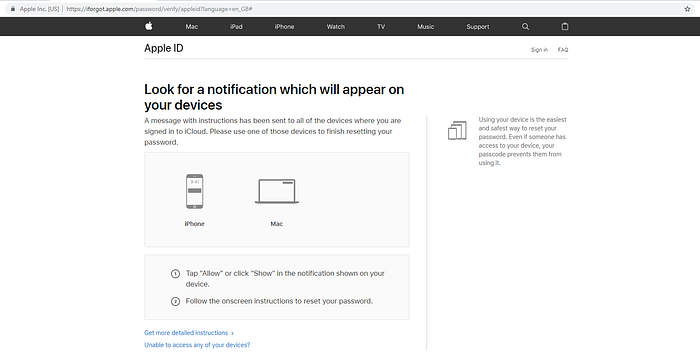
When you have 2FA enabled, you need to authorize a password reset from a trusted device. This is why using a secure, unique password is so important.
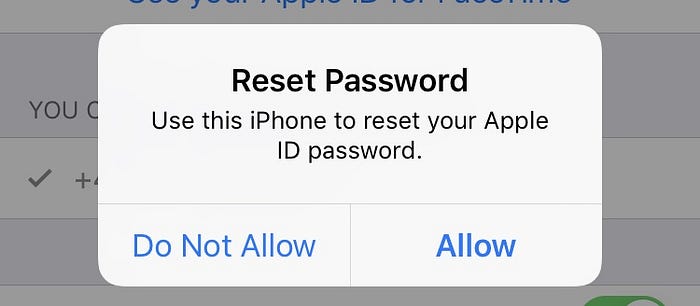
However, someone can also recover your account by clicking “I don’t have access to the trusted device.”

Most of these next methods involve using “Find my iPhone” with the aid of an authorized retailer and one of their devices.
Or, if a bad actor has collected personal information about you, they can attempt to reset your password without a device, though this can take days and cannot be expedited. At the start of the process, you are sent a confirmation code via SMS, so the attacker can intercept this and begin the procedure.
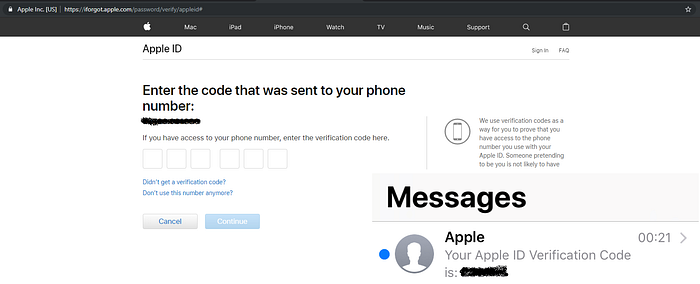
Some of the personal information include things like your long card number, expiry date, and card security code of a payment method attached to your AppleID. These types of requests are sent to Apple and communication is delayed until they can verify the request and will email your AppleID later with a follow-up.
If your device is stolen, you can report it to Apple to get the serial number blacklisted and put it into “Lost Mode.” This means when the device connects to WiFi, the location is pinged to iCloud so you can see where it is.
Apple has very strict security policies and even authorized retailers do not have special powers to recover an account—they are required to verify your government-issued ID and some (if they don’t have ID scanners) ask for a debit or credit card for the account holder. Some retailers verify that the requester has access to the email account linked to the AppleID before they assist.
Key Takeaways
- Ensure any email address(es) associated with your AppleID are secure as these are instrumental for account recovery.
- Ensure you limit the number of “trusted devices” you link to your Apple account to only devices you are actively using.
- Use secure, unique passwords for all your devices.
- Be on the lookout for unexpected emails from Apple and Apple 2FA / recovery prompts on your devices. Get in contact with Apple, an Apple authorized retailer, or someone like Alex from iHelp if you are confused or concerned.
Action Items
Please note: Apple has two different “Two-step” things. You want “Two-factor authentication,” not just “Two-step verification.” Yes, it’s mind-numbing.
- Log into your Apple account and then navigate to https://appleid.apple.com/account/manage.
- Under Security -> Two-Factor Authentication, turn on 2FA.
- If you see Two-step Verification, you need to migrate to “Two-factor Authentication.” Use this guide.
- Check to see if you have any alias emails. Log into appleid.apple.com and check the “Reachable At” section of your account. If you have any alias emails attached to your AppleID, ensure they are secured.
- Remove any app-specific passwords.
- Ensure your phone number is your super-secure Google Voice number, as it can’t be removed and can be used to gain access to your Apple account.
- Remove any devices attached to your AppleID that you are not 100% actively using. You can always add them back in the future.
- Audit devices that are trusted by your AppleID. Remove those not in your possession anymore or ones you don’t use.
- For each device listed, ensure you have enabled and use a secure, unique password. This means that computer #1 has a different password than computer #2 which has a different password than your iPhone.
- (Advised) Take a look at what is being stored on iCloud. Remove sensitive or secret information, or consider limiting what files you store there. Change your iCloud settings to not auto upload your PC images to your iCloud account. While you are in iCloud, audit the “Look Me Up” list.
Total Time
- 15 minutes per Apple account.
Securing your Password Manager
Gaining access to your password manager, like 1Password, LastPass, or another service, means an attacker now has access to any and all passwords, notes, card information, address information, private keys, SSH information, or other secure information you put in the password manager. Most obviously, an attacker can now use this information to access your accounts. Less obviously, they have a list of all the passwords you have used or historically have used.
The two most recommended and accessible solutions are LastPass and 1Password. These are “cloud-based,” although all your secret data is protected and encrypted by a “Master Password” that never leaves your computer / device. This means that there is no “forgot password” button and no way to access your account if you forget your master password.
Action Items
Note: not all of these may be available for your specific password manager.
- Update your master password to ensure it is really, really, really strong, unique, secure, and unforgettable. Don't store the password anywhere except written down on your trusty pieces of paper.
- If you use LastPass, 1Password, or another solution that supports 2FA, enable 2FA via Google Authenticator and / or a hardware device like Yubico.
- Remove any email or SMS Account Recovery.
- See if there is a “security email” or “secondary email” that can set up to receive notifications about new logins and security alerts. This is helpful in preventing an attacker from intercepting and deleting these emails if they gain access to your primary email.
- Enable auto logouts after a certain period of time to ensure there aren’t any random open sessions floating around.
- Remove any trusted devices that you aren’t actively using.
- Remove any mobile devices that you aren’t actively using.
- Once you have passwords in your password manager, check out their “security challenge” or “watchtower.” This will help you update duplicate and weak passwords and highlight your weak spots. Repeat periodically.
If your password manager is a local solution, ensure that your backups are in offline storage and your local devices are encrypted.
Total Time
- 10-20 minutes
Securing your Authy
Each time we recommend against using Authy we get piles of questions and outrage. Here’s our rationale: that super awesome feature that you love so much—the one that allows you to recover your 2FA codes stored in Authy when you get a new phone — it’s a security nightmare! If you can recover your codes, so can an attacker.
To make matters worse, the only thing an attacker needs in order to recover all your Authy codes is a verification number that is sent to you via SMS.
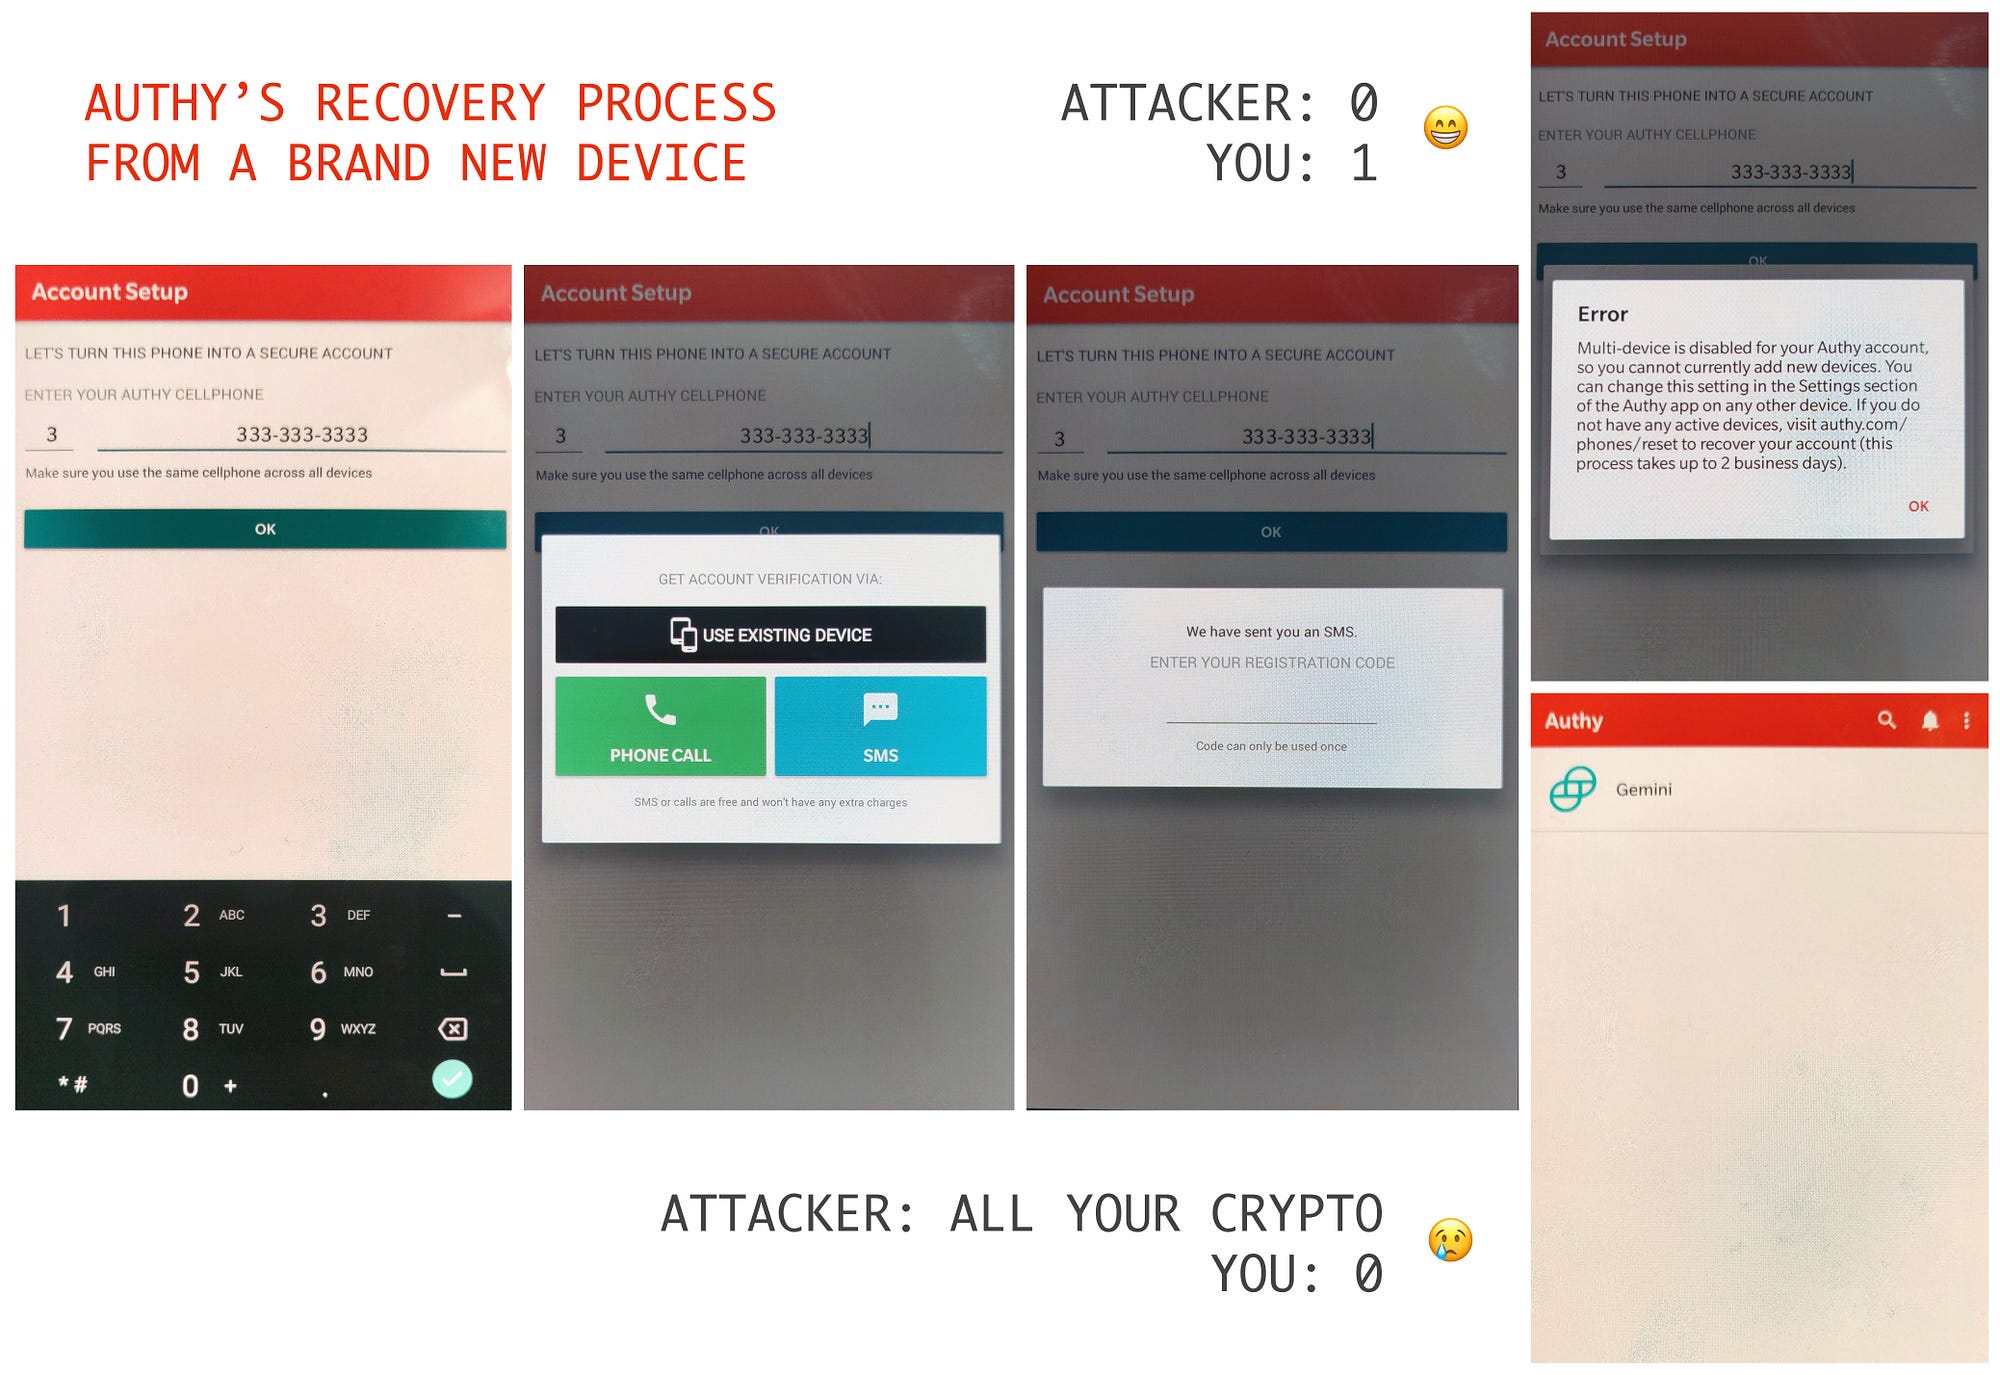
If you get SIM-swapped and they recover your Authy codes on their device, they will have access to all your SMS 2FA codes AND your token-based 2FA codes!
If you absolutely insist on using Authy, you must ensure it's secure.
Action Items
- Use Google Authenticator instead and back codes up on paper.
- That's it!
- Fine….
- Open Authy.
- Open the menu and then select "Settings."
- Change your phone number to the secure-secret Google Voice number from earlier.
- Change your email to that super-secret email you set up earlier.
- Navigate to "accounts" and make sure backups are off. This prevents an attacker from recovering all your codes via email + password.
- Navigate to "Devices" and turn OFF "Allow multi-device." This prevents an attacker from recovering all your codes via a single SMS.
- Select any other devices and click "Remove." This ensures you don't have an old phone laying around with all your codes.
Now, when you get a new phone, you can turn on multi-device support momentarily, set up Authy on your new device, and then turn off multi-device support immediately after. This will migrate your codes. However, this assumes you have your previous phone — you didn't lose it or break it.
If you do lose or break your current phone, you won't be able to recover these codes. So, again, just use Google Authenticator and back up manually via paper. It's not that hard and much more secure.
Total Time
- 2 minutes
Securing your Telegram
If you’re in the blockchain industry, odds are you have Telegram. If you haven’t set up Telegram but plan on doing so in the future, use your Google Voice number.
You may not recall, but you never created a username, provided an email address, or created a password when you set up Telegram. Unless you've adjusted your Telegram settings, the only thing you need to log in is a code provided via Telegram message on a trusted device or a code sent via SMS.
You can make your Telegram a bit more secure by enabling both the "local passcode" and "two-step verification" settings:
Too often, people entirely overlook these Telegram settings (let alone all of the other steps) and while they may not experience financial loss if their Telegram is compromised, their colleagues do when the SIM-swapper hijacks their Telegram account and asks all their contacts for money.
Action Items
- Enable Local Passcode: Navigate to "Settings" > "Privacy and Security." Add a PIN under "passcode lock."
- Prevent others from discovering your phone number: Navigate to “Settings” > “Privacy and Security” > “Phone Number” and select “Nobody.”
- Deactivate phone calls: Choose “Nobody” under “Settings” > “Privacy and Security” > “Phone Calls.” Add exceptions for people you trust and do want to be able to call you. Telegram used to suffer from a vulnerability through which your IP address could leak through phone calls. We’re hopeful it has been — but better safe than sorry.
- Enable 2-Step Verification: Create a strong, unique password and don't use your primary email as the recovery email.
- Bonus points! Under "Active Sessions," remove any that you don't recognize, are on old phones, or are not actively using.
Total Time
- 2 minutes
Securing ALL the Things
You’ve now learned how to secure your accounts, created secure paper backups of important information, and successfully gotten token-based authentication rolling via Google Authenticator.
Here’s the easy, although mildly tedious, next step: You’re going to set up Google Authenticator on every website or service you use that allows it, and remove your phone number / SMS recovery.
Pro-tip: Since you are going to be logging into all these accounts anyways, we recommend you set up a password manager like LastPass or 1Password if you don’t already use one, and create new, secure, unique passwords for each of these accounts. This ensures password reuse doesn’t bite you in the ass, especially with the billions of username / passwords that have been compromised over the years.
While it would be impossible to list every service you may use, here is a prioritized list of what to add your new best friend Mr. 2FA to.
You can also use https://twofactorauth.org/ to view more services and see what 2FA formats they support. The s̶t̶r̶u̶c̶k̶ ̶i̶t̶e̶m̶s̶ don’t offer 2FA at all, or only offer SMS 2FA, so you need to change your phone number to your super-secure Google Voice number.
- Password managers: LastPass, 1Password, etc.
- Backup / Sync / Cloud Storage: Apple / iCloud, Google Drive, Dropbox, Microsoft / OneDrive, B̶o̶x̶, etc.
- Email: Gmail, Apple / iCloud, ProtonMail, Y̶a̶h̶o̶o̶, A̶O̶L̶, etc.
- Exchanges: Coinbase, Gemini, Circle, Binance, Bittrex, Kraken, Poloniex, Huobi, Okex, Bitfinex, Bitstamp, ShapeShift, etc. Note: You shouldn’t be storing significant assets on these, but they should still absolutely be 2FA'd. This also ensures that your fiat / bank accounts can’t be drained and your exchange account isn’t hijacked and used to launder money in your name. Some exchanges (Kraken 😍) allow separate 2FA codes for withdrawals, trades, and logging in. Poke around and enable any security settings your exchange offers!
- Dev: Github, Bitbucket, Gitlab, npm, T̶w̶i̶l̶i̶o̶, etc.
- Web: GoDaddy, Bluehost, Google Cloud, Heroku, Wordpress, Shopify, SquareSpace, AWS, Microsoft Azure, Digital Ocean, CloudFlare, etc.
- Social media accounts: Facebook, Twitter, Instagram, LinkedIn, Google / Youtube, Medium, Tumblr, Buffer, HootSuite, Snapchat, etc. Note: These are often used to defraud your friends or obtain sensitive / secret information when compromised.
- Messaging platforms: Apple / iMessage, Google / Hangouts + Fi + Voice, Skype, Slack, Discord, Telegram, W̶h̶a̶t̶s̶A̶p̶p̶, Facebook Messenger, W̶e̶C̶h̶a̶t̶, V̶i̶b̶e̶r̶, L̶i̶n̶e̶, Gitter, R̶i̶o̶t̶, W̶i̶r̶e̶, S̶i̶g̶n̶a̶l̶, etc. Note: These are often used to defraud your friends or obtain sensitive / secret information when compromised.
- Photo Storage: iCloud, Google Photos, Adobe. Note: Besides screenshots of secrets / backups, SIM-swappers love to utilize, ehrm, certain types of photos to extort people. Consider removing secret / sensitive / sexy photos from your cloud provider entirely.
- Finances / Money: Chase, Wells Fargo, B̶a̶r̶c̶l̶a̶y̶s̶, HSBC, Charles Schwab, Betterment, E*Trade, T̶D̶ ̶A̶m̶e̶r̶i̶t̶r̶a̶d̶e̶, Vanguard, Fidelity, Mint, Y̶N̶A̶B̶, C̶r̶e̶d̶i̶t̶ ̶K̶a̶r̶m̶a̶, Carta, eBay, Alipay, TurboTax, Quickbooks, Robinhood, C̶a̶s̶h̶ ̶A̶p̶p̶, V̶e̶n̶m̶o̶, TransferWise, Paypal, etc.
- Forums: Reddit, S̶t̶a̶c̶k̶E̶x̶c̶h̶a̶n̶g̶e̶/̶S̶t̶a̶c̶k̶o̶v̶e̶r̶f̶l̶o̶w̶, Q̶u̶o̶r̶a̶, I̶m̶g̶u̶r̶, random gaming forums, random hobby forums, old shitty forums, etc.
- Work: A̶s̶a̶n̶a̶, BambooHR, G̶u̶s̶t̶o̶, Jira, Clubhouse, Front, ZenDesk, Zenefits, Groove, Mailchimp, Substack, Salesforce, Slideshare, Trello, SendGrid, Blackboard, Docusign, etc.
- Notes: Evernote, Notion, Scribd, P̶o̶c̶k̶e̶t̶, T̶o̶d̶o̶i̶s̶t̶, etc.
- Shopping: Amazon, T̶a̶r̶g̶e̶t̶, W̶a̶l̶m̶a̶r̶t̶, Newegg, etc.
- Misc: R̶i̶n̶g̶, N̶a̶n̶i̶t̶, B̶l̶i̶n̶k̶, N̶e̶s̶t̶, your car’s app (T̶e̶s̶l̶a̶, M̶e̶r̶c̶e̶d̶e̶s̶ ̶M̶e̶, etc.), S̶p̶o̶t̶i̶f̶y̶, Uber, L̶y̶f̶t̶, A̶i̶r̶b̶n̶b̶, N̶e̶t̶f̶l̶i̶x̶, P̶o̶r̶n̶h̶u̶b̶, S̶a̶m̶s̶u̶n̶g̶, U̶P̶S̶, F̶e̶d̶E̶x̶, D̶H̶L̶, IFTTT, Zapier, G̶r̶u̶b̶H̶u̶b̶, E̶x̶p̶r̶e̶s̶s̶V̶P̶N̶, PIA, ProtonVPN, US IRS, Health Insurance, Utilities, etc.
How to handle sites that only support SMS 2FA?
For whatever bizarre reason (or, depending on who you ask, societal laziness) many websites and services still only offer SMS 2FA. Amazingly, this includes many banks.
Until these laggards catch up, you have two options:
- Insist on using competitors that offer better security. If this is feasible, we highly encourage you to switch to a competitor service and let it be known that you’ve switched for this reason. Speaking with our money (this applies even to "free" sites) is a great way to encourage change.
- If there is no suitable replacement for the service and you must continue using it, utilize your new Google Voice number for SMS activation / account reset.
Last Step: Prepare Yourself
When you have your SIM swapped, you will no longer have the ability to make calls or send text messages, nor will you be able to connect to the internet unless you are connected via Wi-Fi. While this may seem obvious, many victims report fumbling around trying to figure out how to make a call on a phone that can no longer make calls.
Take the time now to set up and practice making a phone call without your SIM card.
First, select & set up a VOIP service that supports calling landlines
- Google Hangouts / Voice: This is your best choice because it’s actually free and it works from your browser or mobile app. Downside: if your Google account is compromised, you won’t be able to access it. So, make sure you secure your Google accounts or Google Voice is set up on multiple accounts. Hangouts on your Computer, Android, iOS or Voice on your Computer, Android, or iOS.
- FreedomPop: An app that gives you a free 200 minutes / month once you set it up. Make sure you test it first. We didn't particularly like the permissions it requested on Android, but it did work on our test device. iOS and Android only.
- Line: The newest rage in Asia and supposedly allows you to make free calls to landlines if you watch an ad first. You’ll have to confirm it works though as it rejected every number we tried calling. Available for literally every device.
- Skype: Available for every device but costs a bit of money to call a landline (as you will need to do in this case). Loading it up with $10 of credit should be sufficient for your needs and is a good choice if you already use Skype.
- Viber: It costs money to call landlines via Viber Out, but if you already use Viber it would probably still be worth it to throw $10 worth of credit on it now just to have it available. iOS, Android, Mac, Windows, Linux.
Action Items
- Take your SIM out of your phone.
- Using the option you chose above (or a different option you prefer), try calling yourself. Ensure the call connects and you hear your voicemail message playing.
- Find your mobile phone provider’s customer support phone number(s). Some are below. They will have a “customer care” number, but also search for a number specifically for urgent or fraudulent situations. For example, AT&T has their “Global Fraud Management Department @ 877.844.5584.”
- Save these numbers to wherever you normally save numbers AND to where you just called from. Save the actual phone number, not the quick-number that only works on certain devices.
- Call this number and ensure you connect and listen to options play. If you feel up to it, have another chat with them about their security offerings. 😉
- If you did this on your computer, repeat on your phone. If you did this on your phone, repeat on your computer.
Some Mobile Phone Provider’s Numbers
- AT&T Fraud: 1 (877) 844–5584
- AT&T: 1 (800) 331–0500
- Cricket Wireless: 1 (800) 274–2538
- Sprint: 1 (888) 211–4727
- T-Mobile: 1 (877) 453–1304
- US Cellular: 1 (888) 944–9400
- Verizon: 1 (800) 922–0204
Thanks to Chris Robison and his SIM swap guide for grabbing all the numbers!
Total Time
- 10-15 minutes
Bonus round!
There are a few things that don't strictly fall in the scope of this guide but are good practices. We’re including them as they are actions victims of SIM-swapping wished they had taken.
Watermark Your KYC Documents
This ensures any documents stolen from an ICO or exchange or your own email / computer / cloud storage cannot be reused for nefarious purposes. It doesn’t matter if it’s a scan of your identity cards, a photo of you holding them, or a photo of you holding them with a date, you should still watermark it:
Okay, this may be overkill, but you get the idea. Now if an exchange or ICO company is breached, they can’t use your identification scans or selfies to launder money or bypass KYC requirements.
Use offline-only, secure back-ups of private keys, passwords, seed phrases, and other super important secrets
Super important secrets are things like private keys, paper wallets, your birth certificate, or social security card. They should be stored in a manner that is optimal for security and long-term, infrequent access.
Do not print or download them. Don’t take a screenshot. Don’t take a photo. Don't save them to iCloud or Dropbox or Google Drive. Don't email them to yourself.
Instead, take out a pen and paper and write down the secret as carefully and legibly as possible. Then, take a new piece of paper and write it down again. Note the account they are for and the date. Keep these in two physically distinct, secure locations.
You could store these in a fireproof / waterproof safe, something like a Steely or CryptoSteel, get a fire-resistance bag for <$20, or simply laminate them or put them in a Ziploc bag sealed with tamper evident stickers.
One reason to have two copies is that if your house burns down, you have another copy. Get in the habit of backing up and storing critical account information, high-risk passwords, recovery codes, 2FA seeds, private keys, and seed phrases in this manner.
This way, if you are SIM-swapped, any account of yours is compromised, or your device is stolen, you simply don’t have to think about those accounts or funds. However, if you store backups in Google Drive or in your photos or in iCloud, the compromise of your account could lead to not only your exchange assets being stolen, but also the assets you don’t keep on an exchange.
More Helpful Resources on the Subject
PART 2: What to do if you literally just had your SIM jacked
Panic Correctly
“Be like the duck — calm on the surface, but paddling like hell underneath.”

Do not let emotions cause you to do irrational and counter-productive things. Your first step is triage and damage control. In order to maximize your own effectiveness, you’re going to need to have the cognitive capacity to multitask effectively. Deep breaths.
Call Your Phone Provider
Remember, your phone no longer has the ability to make phone calls so hopefully you are with someone who is willing to lend you their phone. If you aren't, you can call a landline from Google Hangouts / Voice, FreedomPop, Line, Skype, or Viber. (See the "Prepare Yourself" section above.) However you do it, get on the phone with your mobile service provider.
- Briefly explain the situation at hand. “I am a high-target individual and my phone number was ported approximately 3 hours ago to a new SIM that I do not control, in order to extort and defraud me. What can we do to get this resolved before more damage is done?”
- Ask that your phone number be “turned off,” as in removed from the device it was just moved to, as in not pointed to any working SIM, as in not working for the attacker nor working for you. Sometimes representatives are willing to do this even if they refuse to move your number back to your SIM. Cutting off the attacker’s access is more important than you having access right now. “Since this is an active situation, can you please remove my phone number from that SIM immediately, meaning no one can receive phone calls or text messages to my number. Then I can more fully explain or visit a location in person to verify my identity.”
- Ask for your phone number moved back to your SIM / device. As would be the case, they will likely now decide that you must absolutely, positively be in-store with a government-issued ID. But, it never hurts to ask.
- Ask for and write down the employee’s name / employee ID number and the date / time of your call(s) for your records and future conversations with law enforcement.
- Ask for and write down the case ID number and / or support ticket number for your records and future conversations with law enforcement. If they push back at all, ask them how you are supposed to reference your case when filing a report with law enforcement.
- Request that they (your mobile service provider) retain all logs. Specifically ask for the International Mobile Equipment Identity (IMEI) number, time of call, employees involved in fulfillment of the request, and any other information they have related to your account, the SIM porting, and this situation. Note: they may not disclose certain information to you, but you can ask. Priority should be that it's saved somewhere for law enforcement.
Helpful hints for one of the most frustrating conversations of your life:
- Be direct and focus on getting your phone number “turned off” or back in your control. Be explicit. Repeat yourself. Try to avoid wasting time on what / how / why this happened or who’s at fault.
- Don’t yell. Focus on working with them to accomplish what you need accomplished. This minimum wage, outsourced, call-center employee doesn’t know anything about you, your crypto, or your situation, and you do not have the time to explain it to them. Use phrases like “what can we do to make this happen?” to emphasize that you are a “team.”
- Hang up and try again with a new agent if you get a particularly dense or uncooperative employee. This is likely how your attacker did it, so can you.
- Escalate your call to a person with more experience and power. Try asking specifically for the fraud department, using phrases like “identity theft” and “illegal account creation” and “port out fraud,” which seem to be trigger words. The fraud departments are typically filled with more experienced agents.
Lock Down Your Accounts

As you’re doing this, secure any compromised accounts, assess the damage, and start gathering the most critical information for investigators and law enforcement.
Take notes on everything you do and screenshot excessively. Screenshot when you access something. Right before you change something. Right after you change something. For example, you may kill an attacker's active session, BUT you will want their device type, time accessed, and IP address once the dust settles. Also, being filled with adrenaline while multi-tasking results in terrible, terrible memory and you don't want to repeat work.
Access and change your password for your primary email account(s)
Access the account. Screenshot. Go to your settings and turn on 2FA via Google Authenticator. If it was already enabled, remove it and enable it fresh. Screenshot and then remove any recovery emails or phone numbers to prevent another avenue in. Screenshot and then remove all devices, apps, active sessions, app passwords, “log in with….” sites, connected accounts, etc.
If you cannot access your Google because the attacker has changed the password, follow this guide by Chris Robinson on how start the recovery process for your account. You should do this now.
Check your email for any password reset emails or “you just signed in on a new device” emails
- Be sure to check your spam, archive, and trash folders.
- Screenshot excessively.
- Write down any and all the services you see mentioned in these emails.
Make a prioritized list of accounts to secure
- Accounts that you know the attacker has accessed or attempted to access (such as those in the password reset emails).
- Critical accounts that can lead to further compromise of data or financial loss (other email addresses, exchanges, password managers, cloud storage, banks).
- Accounts that could be accessed with the information found in accounts an attacker has already accessed.
- Any non-critical accounts that could be damaging if compromised, such as older email addresses, social media, messaging, etc.
Starting at the top of your prioritized list, secure all of your accounts
- Log in to each account on your list. Screenshot.
- Change the account password to a strong, unique password.
- Enable 2FA via Google Authenticator. If it was already enabled, remove it and enable it fresh.
- Screenshot and remove any insecure recovery or 2FA methods (e.g., email addresses, phone numbers). Note if the attacker updated any of this information (perhaps to their own email address?)
- Remove the phone number linked to the account and/ or replace it with one the attacker does not control.
- Enable any and all security features that are offered.
- Enable any and all notifications that are offered.
- Screenshot and then remove all devices, apps, active sessions, app passwords, “log in with….” sites, connected accounts, etc.
- Make notes about any financial loss.
- Make a note if there are signs the attacker accessed that account or made any changes.
Secure your exchanges and any other services that hold money (Paypal, Banks)
In addition to the list above, you should take additional measures for your financial accounts.
- If you have any money or crypto currently in these services and you can confidently withdraw to an address or bank account you know you control and could not be compromised, do so now. Initiating the withdrawal will put those funds in a “locked” state for a period of time.
- If you have any money or crypto in these services but you aren’t confident about moving it, you can email them and request they lock down your account and prevent any withdrawals, deposits, trades, buys, sells, transfers, and/or logins until further notice. Links to top exchanges and an email template can be found in Chris Robison’s guide.
- Enable any special security features (e.g., Kraken’s GSL).
- Screenshot and remove any withdrawal addresses, linked bank accounts, credit card numbers or banking information, especially those that could be used to withdraw USD from your bank account (e.g., https://www.coinbase.com/settings/linked-accounts).
- Screenshot and remove any “confirmed devices” or “active sessions” or “browsers that don’t need a second factor” (e.g., https://www.coinbase.com/settings/account_activity).
- Screenshot and remove any and all API keys or OAuth applications (e.g., https://www.coinbase.com/settings/api).
Check your Telegram for active sessions
It is extremely common for SIM-swappers to go for Telegram accounts shortly after attempting cryptocurrency exchange account access.
- Navigate to “Settings” -> “Privacy and Security” -> “Active Sessions.”
- You should now see all devices that have access to your Telegram and messages.
- Screenshot this screen.
- Click the “Terminate All Other Sessions” button.
- Then, returning to “Privacy and Security.” enable “Two-Step Verification.” Use an email that is not compromised.
- Change the phone number to one that is not compromised.
Breathe.
Once you’ve put the proverbial tourniquet on the situation and phone number is back in your control, or at least guaranteed to be out of the attacker’s control, you’ve secured all of your accounts, there are no new password reset emails or other weird things happening….
Breathe.
Give yourself five solid minutes to decompress. You deserve it and it will help you as you go forward. The next steps require less adrenaline and more attention to detail.

Access or Return to Any Accounts You Haven’t Pull Logs From
You will want to check this for each cryptocurrency exchange, bank account, or any other breached account. Save anything and everything, even if you don’t think it’s important. Some examples...
- Gmail: https://support.google.com/mail/answer/45938?hl=en & https://myactivity.google.com/item.
- Google Suite (a custom domain but with Gmail/Google): ask your administrator to pull audits and logs. They are very in depth, such as https://support.google.com/a/answer/4580120?hl=en.
- Coinbase: https://www.coinbase.com/settings/account_activity.
Keep your eyes open for anything you missed the first time around. If you see signs of an attacker accessing one of your accounts, what were they doing? What information were they able to access? What information do you know they accessed? What could they do with that information?
Call your phone provider again
See what information you can get from them at this time. Ask them how you can reference your case when filing a report with law enforcement. See if they have any advice for you.
Sometimes they are able to reveal certain information, such as how this occurred, when it occurred, if it was done in-person or over the phone. Sometimes they will even give you the IMEI and other details. Note all of this.
You should also discuss and implement whatever options they have available to secure your account and ensure this can’t happen again. Sometimes, magically, there now is another layer of protection they can offer you that they didn't think to mention before.
File a report with law enforcement
You’re going to want to begin feeding all of this information to the right people. This begins with filing a law enforcement report. In most countries, the local police are not who you want to go to. Tragically, most local police won’t even know the proper place to report it.
Depending on your country, there are different places you need to report to. You can use this handy list for reference. If you’re in the US, then you’ll want to report it via IC3. Please note that IC3s don’t generate report numbers, so be sure to save a copy of your report upon submission!
Ensure your report includes...
- Your mobile carrier, phone number, time and date of incident, and everything else you’ve recorded regarding your interactions with your mobile carrier (e.g., “they should have the IMEI handy”).
- Steps you’ve taken to subsequently secure your phone number (e.g.. you’ve added a passphrase).
- Accounts that have been accessed (e.g., Gmail and Coinbase) with specific timestamps, device information, IP information, and other data as applicable. Be sure to include the obvious - your email address, the account information (username or registered email) for the exchange, etc.
- Any asset loss, including withdrawal transactions as applicable. If there is a large number of transactions out of a personal wallet or exchange account, note affected personal wallet addresses with a statement like “transactions beginning on X date at Y time were not initiated by me.”
- Any contact the SIM-swappers have made with you post-breach; this will typically be via Telegram or SMS. Annotate account names, how they contacted you (SMS, Telegram, via a third-party), profile pictures, usernames, and the full content of messages.
- Any extremely sensitive data that could have been accessed (KYC documents, trade secrets, etc).
Remember: your role is to operate in facts, not theory. Law enforcement has analysts to theorize. Do not provide unnecessary noise with emotional rants about what you think took place. Provide them with the raw data in as sensible of a format in as chronological an order as possible.
PART 3: What to do after you’ve been SIM jacked

Inform your network
Regardless of what you are feeling right now (embarrassment, shame, and despair are common), you will need to do the right thing for your personal and professional networks. The data obtained by the SIM-swappers cannot only be used to extort you, but to extort others.
Additionally, sharing your experience and lessons learned may inspire those in your network to take measures to improve their own security.
Here's a sample message you can use as a starter:
“I want to let you know that on [DATE] I was SIM swapped and had some of my accounts hacked. Some information in our messages / emails may have been compromised in the process. [NOTE ANY ESPECIALLY RELEVANT SPECIFICS HERE.] I have notified law enforcement and taken steps to secure my phone number and accounts. It is possible that the SIM swapper(s) may contact you or attempt to extort you. If they attempt to do so, please notify law enforcement and do not pay them. While I find this incident embarrassing, I hope that my transparency in this matter is appreciated and we can continue our professional / personal relationship after my hard lesson learned.”
For those of you that are interacting with the victim of a SIM swap, providing the victim support and understanding during this time, and especially gratitude for their transparency, is extremely important. Inversely, if an individual (and especially) a company experiences a SIM swap or other data breach and conceals it, we highly recommend ceasing any relationship with them due to their disregard for you and your own security. You also have the ability to notify pertinent authorities that this individual or business opted to try to sweep the incident under the rug, which is often illegal. Legalities aside, as an industry, we need to begin expecting individuals (and especially companies) to do the right thing.
Fully audit and secure literally all of your accounts
You’ll want to set aside time to go through each and every possible account you can think of: lower-priority accounts you may not have thought of during the “tourniquet phase,” such as old emails, old social media, etc. Any new forensics points you discover (these accounts were accessed) should be annotated.
Additionally, you may want to re-secure and ensure you have secure, offline backups of all of your accounts, passwords, recovery codes, 2FA backups, etc. now that you have more time.
Do not engage with the attacker
Do not under any circumstances engage in conversation with the SIM swapper(s) or those claiming to be them, have information on them, etc.
Document but ignore these messages. This cannot be emphasized enough.
You may experience extortion attempts from the SIM swapper(s), but do not give in to these. If you do, the SIM swapper(s) will simply return to you for more money at a later point, possibly on other accounts.
Giving in to extortion not only provides financial support and incentive for continuity of this crime, but encourages the SIM swapper(s) to engage your network and extort them.
Decide What Information to Share with People
Do not provide any information about the specifics of your case or raw data dumps to anybody that is not law enforcement, your attorney, or an investigator.
There are very few people who qualify as legitimate investigators for this type of crime and they will not be anonymous. Your friends are not investigators. A random dude on Twitter is not an investigator. Currently, the only known professional service for support on these types of incidents is CipherBlade. Anybody that contacts you claiming to have identifying information on those responsible for your incident, for a fee, is attempting to scam you.
Any details you provide to anyone besides your attorney / law enforcement has a tendency to spread rapidly. It is extremely common for internet fraudsters to social engineer both victims and the networks of victims to further extort money and / or determine what tracks they may need to cover.
Decide What Information to Share with the Service Providers of Breached Accounts
It doesn’t hurt to notify exchanges, email providers, or other providers when an account of yours was breached and especially when your assets were stolen. Inform them that your account was breached, you’ve regained access, and you’ve submitted a law enforcement report. If you can, include specific dates, times, transactions, or IP addresses that were not made by you. Include only the information regarding the service you are contacting—don’t give them all your data dumps.
It is highly unlikely these providers will supply you with information you cannot access via your account dashboard, and they especially will not disclose details about another person or account. For example, if you noticed stolen assets ended up transferred to a particular cryptocurrency exchange, that exchange will not provide you with account information due to data privacy laws.
However, giving that exchange a “heads up” that law enforcement may be contacting them soon is still considered to be a good practice.
Protect Your KYC & Identity Documents
If you had identity documents (such as scans of driver’s licenses, passports, etc.) that weren’t watermarked, then you’re going to want to notify authorities immediately and obtain new identity documents. Failing to complete this step may result in your identity being used to open new exchange accounts, new credit cards, new loans, or sold on the dark web and further used for nefarious purposes.
As described earlier, it is your responsibility to notify your professional / personal network of this incident, particularly when it comes to identity documents or other personal details being accessed, because SIM swappers will utilize these documents, conversations, and data to pose as you and conduct impersonation scams — most likely on your contacts.
While failing to inform to your network about potentially breached information may not make you an accomplice in the criminal sense, it makes you an accomplice in the moral one.
Accept Some Harsh Realities & Work to Move Forward
The process by which you move forward from an attack like this, especially if it includes financial loss, often follows the classic "seven stages of loss": shock / denial, pain / guilt, anger, bargaining, depression / loneliness / reflection, reconstruction, acceptance / hope.
By now, the “tourniquet phase”, “control phase”, “shock phase” are complete and you are likely experiencing pain, guilt, sadness, and perhaps even some anger and bargaining for good measure.
While it is tragic you are the victim of a crime, accepting how it happened, what it currently means, what you must do now, and what to expect is critical in order for you to reach a point of acceptance and move forward.
If at any time during this process things get especially tough and you are feeling hopeless, depressed, or suicidal, we strongly encourage you to talk to someone about it. There are so many amazing resources out there, especially if you aren’t getting the support you need from your own personal network.
- Suicide Hotlines (Worldwide)
- More resources
- Even more resources
- And, if you hate phone calls, you can shoot an email to the Samaritans.
You must involve law enforcement
This is non-negotiable. Nobody else is going to legally resolve this matter. No investigator will tell you that your case is legally resolvable without law enforcement and the legal system, and anyone that disputes this is lying to you.
Now is a good time to put aside any personal beliefs, fear, or avoidance of law enforcement. The law enforcement officials you will be in contact with don’t care about your drug preferences or shoddy tax work.
“Hacker for hire” services are almost always scams that capitalize on your desperation and gullibility. At best, you’ll lose (more) money. At worst, you've just implicated yourself in a crime.
Own your own shortcomings, use the opportunity to educate others
"Grant me the serenity to accept the things I cannot change, the courage to change the things I can, and the wisdom to know the difference."
Accept:
- There is no single party who is responsible for your loss except, arguably, the attacker.
- Your phone carrier’s service employees failed to do thorough due diligence on the SIM port request and may have ignored your security settings. (Note that this does not mean the phone carrier is liable for consequences of the SIM swapping, such as loss of assets, when those consequences could have been prevented by proper security settings in other places.)
- The system is partially responsible for even deciding that relying on phone numbers was a good idea.
- You are partially responsible due to a lack of your own due diligence surrounding your personal security.
- You will probably not get your money back.
- You cannot go back in time.
You can only change yourself and your own personal security moving forward. While it's incredibly frustrating to rely on third parties without being able to change or control their behavior, that's the way the world works.
Exclusively blaming your phone provider, your exchange, your email provider, or the blockchain itself will result in a longer recovery process for yourself and a lot of angry, sleepless nights. The goal here is to move past this. Please, don’t be this guy.
Additionally, you will experience immense disappointment if you are expecting your email provider, your exchange, or the general public to investigate, change their behavior, or take any specific actions for you, or because of you. It's unlikely they will do much and if they do, they won't share with you.
On a brighter note, some folks find that sharing their experience and educating those around about how to be more secure can be cathartic and rewarding. Be careful not to reveal exact specifics of your case and focus on helping others rather than playing the blame game. Helping others can help yourself.
Adjust your expectations of law enforcement
While this is, in fact, law enforcement’s responsibility to investigate and resolve, you’ll need to accept the fact that it may be quite some time before any progress is made on your case. Presuming (and this is a big presumption, since the majority of law enforcement reports don’t contain enough actionable information) your law enforcement report contained adequate data to progress your case, in the US, it may be 2-3 months on average before an FBI Special Agent even contacts you regarding the matter.
In 2018, we saw a large number of arrests of SIM-swappers in the US occur in less than a year from time-of-incident to time-of-arrest. We consider this to be lightning speed. Crypto investigations don’t move at crypto speed.
- Telling yourself that the assets are lost actually helps your mental health. Constantly thinking about these assets may tempt you to do things fueled by emotion that will push your case backward, such as engaging with the SIM swapper(s), leaking data, or otherwise making needless noise for investigators.
- Hounding investigators or law enforcement for updates won’t help your cause. To an investigator, “when update?” is equally obnoxious as “when moon?” Investigators and law enforcement may or may not provide you infrequent, pertinent updates. You will not get a play-by-play nor will you get sensitive data. Investigators and law enforcement are extremely busy people with limited amounts of time. Making needless noise for them is pushing rewind, not fast forward.
- There is no guarantee that your SIM swapper will be caught. While there has been a lot of news lately about SIM swappers being arrested, they were located in the US and had impressively bad operations security (opsec), which made the job of investigators far easier. The investigation of your SIM swapper(s) will likely take longer.
- You’re probably not getting 100% of your money back, even if your SIM swapper is caught. Sim swappers tend to live lavish lifestyles with their ill-gotten gains and even after the arrest, the process of asset recovery still hasn’t begun and may take a year or more to complete. This means you’ll get a pro-rata asset recovery, presuming there is enough data to identify you as a victim.
Consider Hiring Professional Help
This could be to assist you with your own mental health and well-being, the investigation, or mitigating damage potentially done to your business due to data loss or ongoing extortion. As we noted before, be extremely skeptical of people who reach out to you to “help” as these are likely scams. Fully review and collect references before hiring anyone.
Additionally, if you are a high net-worth individual or operate a business, now may be a good time to invest more in your security, your business’s security, and / or your employees’ security. There are a number of reputable firms that can provide security audits, awareness training, and identify single points of failure. This isn’t something you can take shortcuts on. Reputable firms will cost money and will take time. In our opinion, it’s money well spent.
Regardless, you are the best person to determine what help you may need. We encourage you to check in with yourself throughout this process, stay mindful, reflect on your situation, and take measures to improve yourself and your life.
Conclusion
Sim-swapping is a terrifying reality in this day and age and is especially prominent in the cryptocurrency industry. As long as phone numbers remain a single point of failure and protect so much value, SIM swapping attacks will continue and likely increase in frequency and sophistication.
Until we change this aspect of the world, you must take responsibility for your own security. By educating and securing yourself, you are one less victim and one less success story for an attacker. Proper preparation prevents piss poor performance.
This article was co-authored by MyCrypto and CipherBlade.
MyCrypto’s experience building one of the most widely-used, “noob-friendly”, Ethereum wallets has taught them the importance of personal security and education within the cryptocurrency space. They’ve experienced these attacks first hand and through their friends and colleagues. MyCrypto is proud to play a role in developing this “anti-sim-swapping bible” and hope it’s contents reduce the amount of loss and successful SIM swaps.
Get in touch with MyCrypto via Twitter, Facebook, or iheartsecurity@mycrypto.com.
CipherBlade is currently the only known professional service to provide support and resources for incidents like SIM swapping. Their dedication to the blockchain space and investigative experience has helped recover millions of dollars of stolen funds, prevented ICO scams, and mitigated emergency security incidents, day and night.
Join CipherBlade on Telegram, Twitter, or hq@cipherblade.com.
If there’s anything we failed to include, could be more clearly stated, or is no longer correct, please find us on any of the links above and we’ll update ASAP.

Seriously, you made it to the end? And… you want more?
- https://medium.com/coinmonks/the-most-expensive-lesson-of-my-life-details-of-SIM-port-hack-35de11517124
- https://www.zdnet.com/article/wave-of-SIM-swapping-attacks-hit-us-cryptocurrency-users
- https://nypost.com/2019/04/13/hackers-are-stealing-millions-in-bitcoin-and-living-like-big-shots/
- https://blog.kraken.com/post/219/security-advisory-mobile-phones/
- https://medium.com/@cipherblade/how-not-to-react-when-your-cryptocurrency-is-stolen-92f7c72616af
- https://medium.com/mycrypto/mycryptos-security-guide-for-dummies-and-smart-people-too-ab178299c82e
- https://winter.mycrypto.com/
- https://cipherblade.com/cybercrime-reporting/
- https://www.youtube.com/watch?v=WW6myutKBYk
- https://coingeek.com/cipherblade-share-a-lesson-about-crypto-theft/
- https://support.mycrypto.com/staying-safe/how-to-securely-store-and-guard-your-private-key
- https://medium.com/changelly/hardware-wallets-101-88442ac385b2
- https://support.mycrypto.com/staying-safe/protecting-yourself-and-your-funds
- https://github.com/crytic/awesome-ethereum-security
- https://github.com/crytic/blockchain-security-contacts
- https://medium.com/mycrypto/mycryptos-security-incident-response-101-36a57b17038b
- https://support.kraken.com/hc/en-us/articles/360000444963-Setting-up-the-Global-Settings-Lock-GSL-
- Titan
- YubiKey
- Ledger
- Trezor


